You’ve seen the photos on Instagram and Pinterest: beautiful, tiny green gardens sealed inside glass light bulbs, glowing warmly on a shelf. It looks magical, like a miniature world frozen in time. You wonder if this is real biology or just plastic decoration.
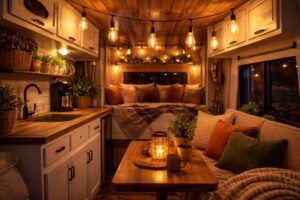
Creating a terrarium inside a repurposed incandescent bulb is a delicate craft, but combining living plants with functional LED Edison bulb lighting is a newer, safer trend. Because LED filaments emit very little heat compared to old tungsten bulbs, you can now place live moss and succulents in close proximity to the light source without cooking them, creating a stunning "living lamp" ecosystem.

I have a customer named Jacky in Oregon. He is a florist.
He used to hate "grow lights."
“Wallson,” he told me, “Grow lights are ugly. They are purple and pink. My customers want decor, not a science lab.”
He wanted to combine his two loves: vintage aesthetics and botany.
He started experimenting with my G125 (large globe) LED filament bulbs suspended directly inside large glass terrariums.
Ten years ago, with hot incandescent bulbs, this would have been a disaster. The heat would turn the terrarium into an oven. Everything would die in an hour.
But with LED technology, the rules have changed.
The bulb stays cool. The plants stay happy.
Now, he sells "Ecosystem Lamps" for $150 each.
This is not just about putting a plant in a jar. It is about understanding light, heat, and biology.
Let’s dig into how you can do this yourself.
Why Are LED Filaments the Only Choice for Plant proximity?
In the old days, a 60-watt bulb generated 90% heat and 10% light. Touching it burned your hand. Placing a fern next to it was a death sentence.
LED Edison bulbs are essential for terrarium lighting because they operate at significantly lower temperatures (usually below 100°F/40°C on the glass surface) while providing high-lumen output. This allows the light source to be placed inches away from sensitive moss and leaves without causing thermal damage or drying out the humidity needed for the ecosystem.

Jacky learned this the hard way.
He tried using a "Vintage Carbon Filament" bulb (the old style) in a closed jar.
The temperature inside the jar hit 120°F in 20 minutes.
The moss turned brown. The condensation evaporated. It was a plant graveyard.
He switched to my G125 LED Spiral Filament.
The Science of Cool Light:
- Efficiency: LEDs convert most energy into light, not heat.
- Gas Cooling: As I have explained before, my bulbs use Helium gas to wick heat away from the chips. The glass surface gets warm, but never "cooking" hot.
Why Plants Care:
Terrariums rely on the "Water Cycle."
Water evaporates from the soil, hits the glass, condenses, and falls back down.
If the light source is too hot, it disrupts this cycle. It forces rapid evaporation. The plants basically steam themselves to death.
With an LED, the temperature rise is gentle. It mimics the sun warming the earth, not a fire scorching it.
You can safely hang an LED bulb 2 to 3 inches above a succulent without harm.
The Spectrum Question: Can They Actually Photosynthesize?
Jacky asked a smart question: "Wallson, these bulbs are yellow (2200K). Do plants actually grow under them?"
The answer is: Yes, for maintenance.
Standard "Grow Lights" use Red and Blue spectrums for rapid growth and flowering. That’s why they look purple.
My warm white LED filaments are "Full Spectrum1." They contain enough blue and red light for slow, healthy maintenance.
Your terrarium moss won't grow a foot a day (which you don't want in a small jar anyway!), but it will photosynthesize2 and stay green.
It is the perfect "Low Light" maintenance solution.
How to Build a "Bulb-in-a-Jar" Lamp?
This is the most popular trend: putting the light inside the terrarium container. It looks like a ship in a bottle, but with light and life.
To build an integrated terrarium lamp, choose a large clear glass container (like a gallon apothecary jar or a wide vase) and use a pendant cord kit to suspend an LED bulb into the upper airspace. The key is to arrange moisture-loving plants like ferns and fittonia at the bottom, leaving enough vertical gap so leaves never physically touch the bulb glass.

Jacky’s "Ecosystem Lamps" are simple but precise.
Here is his recipe:
1. The Container:
Don't use a narrow neck bottle. You need air flow.
Use a wide-mouth cookie jar or a cylinder vase.
2. The Layers (Critical for Drainage):
- Bottom: 1 inch of pebbles or gravel. (Water drainage).
- Middle: Activated Charcoal. (This prevents mold and bad smells in the damp environment).
- Top: Potting soil mixed with sand.
3. The Plants:
Do not plant cactus here! Cactuses hate humidity.
Use Moss, Ferns, Fittonia (Nerve Plant), or Pothos.
These plants love the "greenhouse effect" created by the jar.
4. The Light Suspension:
Buy a simple "textile cord pendant" with a socket.
You can drill a hole in the lid (like we did for the Mason Jars) or, if there is no lid, build a simple wooden bracket to hang the cord over the center of the jar.
The "Hovering" Rule:
Lower the bulb into the jar.
Stop when the bottom of the bulb is at least 3 inches above the tallest leaf.
If the leaf touches the bulb, even an LED, the contact heat will scorch that spot.
Also, the leaf blocks light for the plants below.
The Result:
When you turn it on at night, the light reflects off the glass walls and the condensation droplets.
The green leaves glow from within.
It creates a humid, mystical atmosphere that a regular table lamp cannot match.
Water vs. Electricity: The Safety Barrier
Water and electricity are enemies.
In a terrarium, humidity3 is 90%.
Standard light sockets are not waterproof.
Pro Tip: Apply a thin layer of clear silicone sealant4 around the gap where the bulb glass meets the metal socket.
Or, simply ensure the socket itself acts as a "lid" or stays outside the main humidity zone if possible.
For open-top jars, the humidity escapes, so corrosion is less of a risk.
Check the socket every 6 months. If you see green rust (oxidation), replace the socket.
Can You Actually Hollow Out an Old Light Bulb for a Micro-Terrarium?
We have all seen the DIY hack where someone breaks open a light bulb and puts plants inside. It is a cute craft project, but is it a practical "light"?
Hollowing out a standard A19 incandescent bulb to use as a tiny planter is a fun upcycling craft, but these cannot function as light sources anymore because the filament is removed. These "dead bulb" terrariums are purely decorative and are best displayed hanging in clusters near a separate external light source to make the glass sparkle.

Jacky tried to sell these, but he stopped.
"Wallson," he said, "It is too much work for too little payoff."
The Danger Factor:
To do this, you have to break the black glass insulator at the bottom, smash the internal glass stem, and shake out the filament shards.
It is dangerous. You can slice your thumb easily.
Unlike my factory-made bulbs, old bulbs contain white kaolin powder (which is messy) or sometimes nasty chemicals depending on the age.
What You Get:
You get a tiny glass sphere.
It is too small for soil. It is too small for roots.
You can only put "Air Plants" (Tillandsia) inside.
Air plants don't need soil; they just need air and misting.
The Lighting Problem:
Once you gut the bulb, it produces no light.
It is just a glass ornament.
If you hang 10 of them in a window, they look pretty catching the sunlight.
But as a "lighting product," they are useless.
My Advice:
If you want the "Bulb Look" but want live plants inside, don't break old bulbs.
Buy "Terrarium Bulb Vases."
These are factory-made glass containers shaped exactly like a light bulb, but they have a flat bottom and a side opening for easy planting.
They are safer, thicker, and designed for the job.
You can then illuminate them from the outside using a spotlight or a lamp.
The "Marimo Moss Ball5" Aquatic Option
If you really want to use a hollow bulb, make it aquatic.
Water plants are easier than soil plants in a tiny space.
Fill the hollow bulb with water.
Drop in a tiny "Marimo Moss Ball" or a cutting of aquatic Anubias6.
The water magnifies the plant like a lens.
Since it is full of water, you cannot electrify it, but if you place it on a small LED "coaster" light base, it glows beautifully from the bottom up.
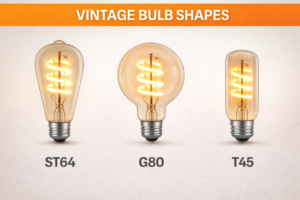
Choosing the Right Bulb Shape for Plant Growth?
Not all bulbs are created equal when it comes to covering a wide area of plants. A narrow tube bulb might look cool, but it won't feed light to the fern in the corner.
For plant lighting, bulb geometry dictates light distribution; large globe bulbs (G80/G125) offer the widest beam angle for broad coverage, while pear-shaped (ST64) bulbs focus light downward. Additionally, "High Lumen" clear glass models are superior to amber-tinted versions for plant health, providing the intensity needed for photosynthesis.

Jacky asked me to send him samples for his new shelf display.
He has a long shelf of succulents.
The Amber Trap:
He initially used my "Golden Tint" bulbs because they looked vintage.
But after two weeks, his succulents started "stretching" (etiolation).
They were growing tall and skinny, reaching for light.
The amber coating blocks too much of the blue spectrum.
The plants were starving.
The Switch to Clear:
I sent him my Clear Glass High-Lumen Series.
These have no gold tint. They are crisp and bright (2700K or 3000K).
They produce 800+ lumens.
The plants stopped stretching. They stayed compact and healthy.
Shape Selection:
- For Wide Terrariums: Use the G125 Globe. It casts light in a huge circle, covering the whole jar evenly.
- For Tall/Narrow Jars: Use the T30 Tube. It fits down into the cylinder and lights the plants from the side, not just the top.
- For Spotlighting: Use an R63 or R80 Reflector. These have mirror coatings on the sides to shoot all the light down. This acts like a mini-sun beam for a specific prize plant.
The Timer is Your Assistant
Plants need sleep too.
Do not leave the light on 24/7.
Plants need a "dark cycle7" to respire.
If you leave the light on forever, the moss will turn yellow and the plants will get stressed.
Connect your LED Terrarium Lamp to a simple Smart Plug8 or mechanical timer.
Set it for 12 hours ON, 12 hours OFF.
This mimics the tropical day/night cycle that most house plants love.
Conclusion
Combining botany with LED technology creates a "living decor" piece that feels magical. Unlike the hot bulbs of the past, modern LED Edison filaments run cool enough to coexist with moisture-loving ferns and moss inside a glass vessel. The key is balance: allow for air ventilation to prevent overheating, use clear glass bulbs to ensure plants get the full spectrum of light they crave, and maintain a safe distance between the leaves and the light source. With a little creativity, you can stop just illuminating your room and start growing it.
Exploring Full Spectrum grow lights can enhance your knowledge on effective lighting for plant health and growth. ↩
Understanding how plants photosynthesize can help you choose the right lighting for optimal growth. ↩
Learn about the impact of humidity on electrical safety to better protect your devices and ensure a safe environment. ↩
Explore this link to understand the versatile applications of clear silicone sealant, especially in preventing moisture damage. ↩
Discover the unique benefits of Marimo Moss Balls, including their aesthetic appeal and water purification properties. ↩
Learn essential care tips for aquatic Anubias to ensure they thrive in your aquarium setup. ↩
Learn about the significance of a dark cycle for plant health and how it affects growth and respiration. ↩
Explore this link to understand how a Smart Plug can enhance your plant care routine by automating light schedules. ↩