Photographers usually spend thousands of dollars on softboxes, strobes, and ring lights to get the perfect shot. They want clean, white, powerful light. So why are so many portrait photographers and Instagram influencers suddenly dragging old-fashioned, dim, yellow light bulbs into their studios?
LED Edison bulbs are not used to light the subject in photography; they are used to light the scene. Because these bulbs have a low lumen output and no "flicker" on camera, they serve as the perfect "practical lights"—props that appear in the frame to create mood, depth, and "bokeh" (blurry background balls of light) without blowing out the exposure or ruining the skin tones of the model.

I have a customer named Jacky. He is not a builder this time; he is a wedding photographer.
He used to complain about reception lighting.
"Wallson," he said, "Wedding venues are too dark. But if I use my flash, it destroys the romantic atmosphere. It looks like a hospital."
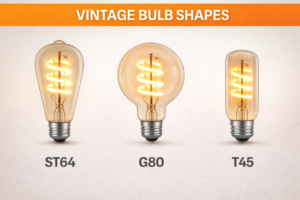
He started bringing a crate of my ST64 LED bulbs to his shoots.
He hangs them in the background. He puts them in lamps on tables.
Now, his photos look warm, magical, and expensive.
He didn't need more light power. He needed more "light texture."
Using Edison bulbs in photography is tricky. If you do it wrong, your photo looks yellow and muddy.
If you do it right, it looks like a scene from a movie.
Let me teach you the secrets of the "Practical Light."
What Is a "Practical Light" and Why Do You Need It?
In film and photography, there are two kinds of lights. "Key Lights" are off-camera (like the sun or a flash) and do the heavy lifting. "Practical Lights" are lights that are actually visible inside the picture, like a desk lamp, a neon sign, or a string of bulbs.
Edison bulbs are the ultimate "practical lights" because their filaments are visually interesting enough to stare at directly. Unlike a frosted white bulb that just looks like a white blob on camera, an Edison bulb shows texture and detail even when turned on, adding a layer of complexity and storytelling to the background of your image.

Jacky explained the "Black Hole" problem to me.
When you shoot a portrait in a studio, the background is often just black space or a flat paper roll.
It feels two-dimensional. Boring.
The Fix:
Place a tripod with a single hanging Edison bulb about 6 feet behind your model.
Now, the camera sees:
- The Model (Lit by your flash).
- The Darkness.
- The Warm Glow of the bulb deep in the back.
This creates Depth.
The viewer's eye travels from the face to the background.
It creates a 3D environment.
Why LEDs Win Here:
If you used an old tungsten bulb, it would get hot.
If the model touched it, she would burn her shoulder.
If you put it near a curtain, you risk a fire.
With my LED filaments, the bulb is cool.
You can have the model hold the bulb in her hands closer to her face for a magical "fortune teller" look.
Safety allows creativity.
The "Flicker" Problem
Have you ever taken a video of a light bulb with your phone, and seen weird banding lines scrolling down the screen?
That is Pulse Width Modulation (PWM)1 flicker.
Cheap LEDs flicker on and off thousands of times a second. Your eyes can't see it, but the camera shutter can.
It ruins the shot.
For photography, you must buy "Flicker-Free2" LED bulbs.
I tell all my photographer clients: "Do not buy the $1 bulb at the supermarket."
Our bulbs have a "Constant Current Driver" inside the base. This acts like a shock absorber for the electricity.
It ensures a smooth stream of light, so your video slow-motion looks buttery smooth.
How Do You Achieve the Perfect "Bokeh" Effect?
You know those creamy, blurry circles of light in the background of Christmas portraits? That is called "Bokeh" (a Japanese word for blur). Photographers chase this look obsessively.
To get large, smooth bokeh balls in your background, you need a light source that is small, bright, and distinct—Edison bulbs are perfect for this. By using a "Spiral" filament bulb and placing it far behind your subject while shooting with a wide aperture lens (like f/1.8), the detailed spiral filament melts into a beautiful, swirling orb of golden light that frames the subject.

Jacky uses my G125 (Giant Globe) bulbs for this.
The Recipe for Bokeh:
- Distance: Put the model 5 feet away from the camera. Put the Edison bulbs 10 feet behind the model. The further back the bulbs are, the bigger the blur.
- Aperture: Open your lens wide (f/1.4 or f/1.8). This creates a "shallow depth of field."
- The Filament Shape:
This is the secret sauce.
A single straight wire filament makes a boring circle.
A Spiral Filament makes a bokeh ball with texture inside it. It looks like a swirling galaxy.
The "Starry" filament (tiny diodes on a stick) creates a "sparkle" effect even when blurred.
Why Amber Glass Matters:
The golden tint of the glass warms up the bokeh.
It mimics candlelight or sunset.
It creates a color contrast.
Usually, photography lighting (Flash) is "Cool White" (5600K).
The Edison Bulb background is "Warm Amber" (2200K).
Cool Subject + Warm Background = Professional Look.
This creates "Color Separation." It makes the subject pop off the screen.
Controlling the Brightness (The Dimmer3)
The biggest mistake beginners make is the bulb is too bright.
If the bulb is 800 lumens4, it will "blow out" the image. It will just be a white explosion. You lose the filament detail.
You want the camera to see the wires, not just the light.
You must use a Dimmer.
Dial the bulb brightness down to about 30% or 40%.
At this level, the light is weak enough that the camera sensor can capture the individual golden threads of the filament without being blinded.
It becomes a texture, not a flare.
Can You Use Edison Bulbs as the Main Key Light?
So far, we have only talked about using them as props in the background. But can you actually light a face using only these bulbs?
Using Edison bulbs as a key light is challenging because the color is very yellow (CRI issues) and can make skin look jaundiced. However, for moody, artistic, or "noir" style portraits, a cluster of clear-glass, high-CRI LED filaments can produce a unique, hard-shadowed lighting style that mimics the look of 1920s cinema.

Jacky tried this for a whiskey commercial shoot.
He wanted "Old Bar" vibes.
He turned off his strobes. He built a "board" with 9 of my ST64 bulbs mounted on it.
He used this as his main light.
The Color Challenge:
Standard Edison bulbs have a CRI (Color Rendering Index) of around 80.
And the color temperature is 2200K (very orange).
If you shoot a person with this, they look like an Oompa Loompa. They look orange.
How to Fix It in Camera:
You must change your White Balance (WB) setting.
Set your camera WB to "Tungsten" or "2500K".
The camera creates blue to fight the orange. The image balances out to neutral.
The "Hard Light" Effect:
Softboxes make light soft because they are big.
Filaments are tiny. Small light sources create hard, sharp shadows.
This lighting is not forgiving. It shows wrinkles. It shows texture.
But for a rugged "masculine" portrait or a mysterious "femme fatale" shot, it is incredible.
It creates high contrast. Dark blacks, bright highlights.
The "Ring Light" Hack:
Some creative DIYers build a giant wooden ring and mount 12 Edison bulbs on it.
They shoot through the center of the ring.
This creates a "catchlight" in the model's eye that is a circle of dots.
It is a vintage version of the modern beauty ring light.
(Note: Use clear glass bulbs for this, not amber, to get more skin-accurate tones).
Capturing the "Starbust" Effect
Have you seen photos of streetlights at night where the light has spikes coming out of it like a star?
You can do this with Edison bulbs5 too.
You don't need a special filter.
You just need to close your aperture.
Set your camera to f/11 or f/166.
The blades of the lens shutter create the diffraction spikes.
Because the LED filament is a concentrated point of light, it starbursts beautifully.
This is great for product photography—like a photo of a beer bottle with a sparkling Edison bulb next to it.
Conclusion
Photography is literally "writing with light." Standard studio lights are like a plain ballpoint pen—reliable and clear. LED Edison bulbs are like a gold calligraphy fountain pen—they add style, flair, and emotion. They are not meant to replace your flash, but to support it. By using them as practical props in the background, dialing down their brightness to reveal the filament texture, and using their warm color to contrast against cool daylight, you can elevate a boring snapshot into a cinematic portrait. Just remember: get flicker-free bulbs, use a dimmer, and keep them in the background for that creamy, dreamy bokeh.
Understanding PWM flicker is crucial for photographers to avoid ruined shots and improve video quality. ↩
Exploring Flicker-Free bulbs can help you choose the right lighting for photography, ensuring smooth and professional results. ↩
Understanding how a dimmer functions can enhance your lighting setup, ensuring optimal brightness for photography. ↩
Exploring the meaning of lumens will help you choose the right brightness for your lighting needs, improving your photography results. ↩
Edison bulbs add a unique aesthetic to photos; exploring their impact can elevate your product photography. ↩
Understanding aperture settings like f/11 or f/16 can enhance your photography skills, especially for capturing effects like starbursts. ↩