You walk into a high-end hotel lobby or a celebrity’s dining room, and your eyes are immediately drawn upward. Massive, intricate chandeliers hang from the ceiling, acting less like lights and more like sculpture. You assume these custom installations cost tens of thousands of dollars.
Building a custom chandelier is surprisingly accessible when you shift your focus from complex crystal frameworks to the bulbs themselves. By using multiple LED Edison bulbs as the primary design element and organizing them with simple "spiders," reclaimed wood, or metal hoops, you can create large-scale, dramatic lighting installations that look professionally designed but cost a fraction of the retail price.

I have a customer named Jacky. He flips houses in Chicago.
He knows that the kitchen and the dining room sell the house.
He used to buy $800 chandeliers from Wayfair. They were okay, but generic.
One day, he saw my catalog of oversized LED filaments.
He asked me, "Wallson, instead of buying a lamp with a bulb inside, can I make a lamp out of just the bulbs?"
I sent him 12 of my G125 (Globe) spiral filament bulbs and some simple cloth wire.
He built a "Cluster Chandelier" for his next open house.
The real estate agent told him it was the first thing people commented on.
"It looks like an art gallery," they said.
The secret is volume.
One Edison bulb is a lamp. Twelve Edison bulbs are a statement.
Because my LEDs use so little power (4W each), you can group 10 or 20 of them together on a single circuit without blowing a fuse.
Let's look at three specific projects that range from "Minimalist" to "Grand."
The "Spider" Chandelier: How Do You Fill a Large Ceiling Space?
If you have a large living room or a loft with nothing on the ceiling, a standard fixture looks tiny and sad. You need something that spreads out.
The "Spider Chandelier" consists of a central ceiling canopy with multiple long electrical cords (usually 6 to 12) radiating outward like spider legs. By hooking each cord to a different point on the ceiling using simple swag hooks, you can adjust the height and spread of every single bulb, allowing you to customize the fixture's footprint to perfectly match the size of your room.

Jacky uses this in rooms with weird layouts.
Maybe your dining table isn't exactly in the center of the room.
With a rigid metal chandelier, you are stuck. It hangs where the electrical box is.
With a Spider Chandelier, you are free.
Materials Needed:
- Multi-Port Canopy: A ceiling plate with 8, 10, or 12 holes.
- Long Cloth Cord: You need about 2 to 3 meters per "leg."
- Ceiling Swag Hooks: These are small hooks that screw into the drywall (use anchors!).
- Socket Grips: To hold the bulbs.
The Installation Trick:
First, mount the central canopy to the electrical box. This is where all the wires connect to power.
Then, take one cord. Walk away from the center.
Decide where you want that bulb to hang. Mark the spot.
Screw in a hook.
Drape the wire over the hook.
Adjust the length so the bulb hangs at exactly the height you want.
Repeat this 10 times.
Why It Works:
You are "drawing" on the ceiling with black wire.
The draped curves of the wires create visual interest.
It makes the ceiling feel lower and more intimate.
Visual Chaos vs. Order:
You have two choices for the layout.
Option A (Chaos): Hang the hooks at random distances and random heights. This feels organic and modern.
Option B (Order): Measure a perfect circle around the center. Hang every hook at the exact same distance. This feels clean and industrial.
Managing the Tangle
When you have 10 wires coming out of one hole, it can get messy.
Before you hang the canopy, use "Zip Ties1" or electrical tape to bundle the wires together inside the junction box phase.
Label them if necessary.
If you don't bundle them, trying to push the canopy against the ceiling will feel like wrestling an octopus.
Bulb Selection for Spiders
Because the bulbs are far apart, they don't blend together. Each bulb stands alone.
Use a large bulb. A standard A19 looks like a toy here.
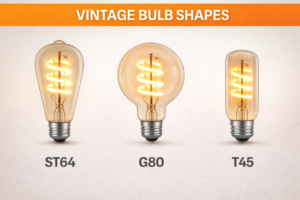
Use the G95 or G125 Globe2.
The round shape looks like a hanging fruit or a drop of water.
Keep all bulbs the same shape for unity, or alternate shapes (Globe-Pear-Globe) if you want an eclectic look.
The "Beam & Wrap" Linear Chandelier: How to Light a Long Table?
We discussed this briefly in previous articles, but let's dive into the "Custom" aspect of it. This is the ultimate DIY for dining rooms because it is perfectly linear.
For long rectangular dining tables or kitchen islands, a single round chandelier creates poor lighting, leaving the ends of the table in shadow. By suspending a long structure—like a ladder, a wooden beam, or a metal pipe—horizontally, you can wrap multiple pendant lights along its length, ensuring that every guest at the table sits in warmth and light.

Jacky found an old wooden ladder in a barn.
He didn't know what to do with it.
I told him: "Hang it over your kitchen island."
The Structure:
You are not limited to wood beams.
The Ladder: Adds instant farmhouse charm. Run the cords through the rungs.
The Branch: Find a sturdy, dry tree branch. Strip the bark. It looks organic and wild.
The Copper Pipe: If you want a modern look, build a rectangle out of shiny copper pipes.
The Wrapping Technique:
The beauty of this style is that you don't need to drill holes/
You literally "wrap" the cord around the object.
This means you can change the design later!
Want the bulbs lower for a romantic dinner? Unwrap one loop. The bulb drops down.
Want them higher for a poker game? Wrap it once more. The bulb goes up.
It is an adjustable light fixture.
Hiding the mess:
The hardest part is: "Where do the wires go?"
If you have 5 pendants, you have 5 cords plugging in somewhere.
You can run them all up to a single ceiling canopy.
Or, you can embrace the "Swag" look and let the cords drape loosely up to the ceiling.
Bulb Rhythm:
Don't just hang them in a straight line.
Stagger them.
High, Low, High, Low.
This creates a "Wave" effect that is very pleasing to the eye.
Mixing bulb shapes here is fantastic.
Try a pattern: Tube - Globe - Tube - Globe - Tube.
It creates a visual rhythm that matches the chairs at your table.
Weight Distribution is Critical
I must warn you: wood beams and ladders are heavy.
Do not hang this from the electrical box alone.
The plastic box in your ceiling is rated for 50 lbs max.
A solid beam plus plumbing fixtures plus glass bulbs can weigh 80 lbs.
You must find the wooden joists3 (studs) in your ceiling.
Use heavy-duty "Eye Hooks" screwed directly into the wood joists to hold the chains that support the beam.
The electrical wire should carry zero weight of the beam. It should only carry the bulb.
The Problem of Shadows
If you use a thick beam, it will cast a shadow on the ceiling.
This creates a "dark ceiling, bright table" effect.
Some people love this moody look.
If you hate it, install a small LED strip light4 on the top side of the beam pointing up.
This washes the ceiling with light and kills the shadow.
The "Hoop" Chandelier: How to Get the Medieval Castle Look?
Think of the old castles with iron rings of candles. You see this style in "Game of Thrones" or high-end rustic lodges. We can recreate this with modern parts.
A hoop chandelier uses a large metal or wooden ring as the frame, with bulbs mounted evenly around the perimeter. This circular layout distributes light 360 degrees around the room and creates a stunning focal point that feels historic and substantial, primarily when using "candle-style" LED filament bulbs.

Jacky wanted a "Viking" vibe for his man cave.
He bought a steel wagon wheel rim.
He cleaned it, painted it matte black, and turned it into a light.
Building the Hoop:
You can buy pre-bent metal rings, or use things like:
- Bicycle wheels (remove the tire).
- Wine barrel hoops (very rustic).
- Hula hoops (spray painted gold—it actually works!).
Orientation:
You have two choices:- Bulbs Down: The standard modern look. Good for lighting the room floor.
- Bulbs Up: The "Candelabra" look. The bulbs sit on top of the ring like candles. This reflects light off the ceiling and feels very formal.
The Wiring Challenge:
This is the hardest project to wire.
You have to hide the wire along the ring.
If you use a metal tube ring, you can run wire inside it. (Very pro).
If you use a flat ring (like a wine barrel hoop), you have to staple the wire to the back or top of the ring where people can't see it.
Use black "Zip Ties" to secure the wire to the ring. If the ring is black, the ties disappear.
The Bulb Choice:
For the "Candle" look (Bulbs Up), you must use the C35 Candle Bulb with a "Flame Tip."
I make these with a special "looped" filament that looks exactly like a candle flame.
For the "Modern" look (Bulbs Down), use the ST64 Pear.
It looks like drops of amber glass dripping from the ring.
Centering the Chains
To hang a ring flat, you need 3 or 4 chains meeting at a center point.
If the chains are not exactly the same length, the ring will tilt.
It will look lopsided.
Use chains with "S-hooks5" so you can adjust the links one by one until it is perfectly level.
Use a bubble level on the ring during installation.
Dimming is Non-Negotiable
A hoop with 12 bulbs is essentially a sun.
Even with 4W bulbs, that is 48W of LED light (equivalent to a 500W halogen floodlight).
It will be blindingly bright.
You absolutely need a dimmer6.
When you dim these "Candle" bulbs down to 10%, the filaments get very orange.
Sitting under a hoop chandelier dimmed low feels exactly like sitting around a campfire. It triggers a primal relaxation response in the brain.
Conclusion
Custom chandeliers are not about intricate glass blowing or welding metal. They are about geometry and composition. By taking the humble LED Edison bulb and multiplying it—spreading it out like a spider, lining it up on a beam, or circling it on a hoop—you create volume and drama. The bulb provides the aesthetic; your job is just to provide the structure. Whether you are lighting a dining table or a massive living room, these DIY projects allow you to fill the space with warm, amber light for a cost that is often less than a single designer table lamp. So look at your ceiling, find a stud, and start planning your masterpiece.
Discover tips and tricks for using Zip Ties to keep your wires organized and tidy, making your setup look professional. ↩
Explore this link to understand why G95 or G125 Globe bulbs are ideal for your lighting needs, enhancing both aesthetics and functionality. ↩
Understanding wooden joists is essential for safe installations. This resource will provide insights into their structural importance. ↩
Explore how LED strip lights can enhance your space by reducing shadows and improving ambiance. ↩
Explore this link to understand the versatility of S-hooks in various hanging applications, ensuring your installations are secure and adjustable. ↩
Learn why using a dimmer with LED lights enhances ambiance and comfort, making your lighting experience more enjoyable and energy-efficient. ↩