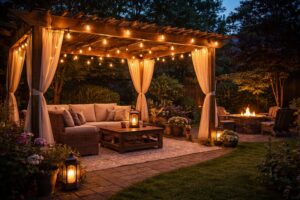
You are bored with the generic lighting fixtures sold at big-box hardware stores. You want something unique, industrial, or rustic that reflects your personality, but designer lighting costs a fortune. You have a few beautiful LED Edison bulbs, but they are currently sitting in boring table lamps.
Creating your own LED Edison bulb fixtures is a rewarding way to achieve a high-end designer look for a fraction of the cost, combining the warm vintage aesthetic of filament bulbs with raw materials like plumbing pipes, reclaimed wood, or Mason jars. By understanding basic wiring safety and selecting the right components, you can build custom chandeliers, sconces, and pendant lights that become the centerpiece of any room.

I have a customer named Jacky. He is not just a buyer; he is a creator.
He runs a boutique hotel in Nashville.
Instead of buying $500 sconces, he bought 300 of my ST64 spiral filament bulbs and a pile of black iron pipes.
He spent a weekend in his garage building custom fixtures.
When I visited his hotel, I was shocked.
The lighting looked like it cost a million dollars.
He told me, "Wallson, the bulb is the art. The fixture is just the frame."
This is the secret to DIY lighting.
Since my LED Edison bulbs run cool to the touch (unlike the old hot tungsten ones), you have much more freedom in the materials you use.
You can use wood, rope, or even old wine bottles without fear of fire.
But before you start twisting wires, you need a plan.
Let's explore three specific projects that range from "Beginner" to "Advanced."
The "Pipe Dreams" Sconce: How Do You Build an Industrial Wall Light?
This is the classic "Steampunk" look. It is robust, masculine, and incredibly easy to assemble because the parts screw together like LEGOs.
Black iron plumbing pipe (available at any hardware store) serves as the perfect conduit for wiring and a sturdy structural arm for wall sconces. By threading generic lamp wire through ½-inch pipe fittings and attaching a standard E26 socket, you can create a rugged, adjustable fixture that pairs perfectly with the warm glow of a tubular or pear-shaped Edison bulb.

Jacky loves this design for his hotel hallways.
It is indestructible. A guest can bump into it with a suitcase, and it won't break.
Materials Needed:
- ½-inch Black Iron Floor Flange: This is the disk that screws into the wall.
- ½-inch Threaded Nipples and Elbows: These create the "arm."
- E26 Keyless Socket: I recommend a brass or black bake-lite socket.
- 18-Gauge Lamp Wire: Choose a cloth-covered wire for that vintage look.
- LED Edison Bulb: A T45 (Tubular) or ST64 (Pear) shape looks best here.
The Assembly Process:
First, you need to clean the pipes.
Black iron pipe comes with a grease coating to prevent rust. It is messy.
Wash everything with degreaser and dry it.
Apply a clear coat spray paint if you want to seal it.
Next, "Dry Fit" the pieces. Screw them together to find the shape you like.
Maybe you want a simple "L" shape. Maybe you want a "U" shape so the bulb hangs down.
The Wiring Trick:
This is where people get stuck.
You must thread the wire through the pipes before you screw the socket on.
Feed the wire from the wall side (flange) through the elbow and out the end.
Connect the wire to the socket (Gold screw = Black/Hot wire, Silver screw = White/Neutral wire).
Then—and this is critical—twist the wire backwards a few turns before you screw the socket onto the pipe.
Why? Because as you screw the socket tight (clockwise), it will untwist the wire inside the pipe.
If you don't do this, you will twist the wire until it snaps inside the metal tube.
Mount the flange to a stud in the wall, screw in the bulb, and you have instant industrial charm.
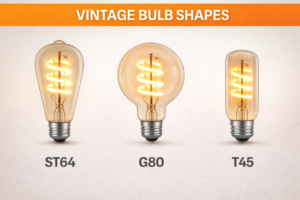
Choosing the Right Bulb shape for Pipes
For pipe fixtures, the geometry matters.
Avoid the round G80 or G125 globes. They look too "bubbly" against the hard lines of the iron.
Use the ST64 (Teardrop)1 or T45/T10 (Test Tube) shapes.
The elongated lines of these bulbs mimic the straight lines of the pipes.
Also, choose a "Spiral" LED filament.
The pipes are rigid and cold; the spiral filament adds a soft, organic curve that balances the design.
Safety Note: Grounding Metal Fixtures
Since the entire fixture is made of conductive metal, safety is paramount.
If a live wire frays inside the pipe and touches the metal, the whole lamp becomes electrified.
If you install this in a permanent junction box (in the wall), you must connect the ground wire2 (green/copper) from your house to the metal mounting bracket or the green screw on the crossbar.
This ensures that if a short happens, the breaker trips instead of shocking you.
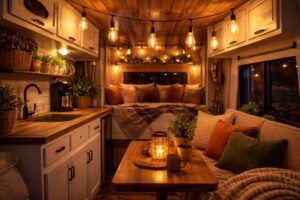
The "Reclaimed Beam" Chandelier: How Can Old Wood Become Modern Art?
If you have higher ceilings or need a centerpiece for a dining table, a wood beam chandelier is a stunning option. It contrasts the natural grain of timber with the glass technology of the bulb.
By suspending a weathered wooden beam or log horizontally from the ceiling using chains, and wrapping multiple pendant cords around it at varying heights, you create a dramatic "linear chandelier." This design hides all the ceiling electrical connections on top of the beam while showcasing a cascading array of different LED Edison bulbs below.

I see this design in high-end coffee shops all the time.
It looks complicated, but it is actually just simple wrapping.
Finding the Beam:
You can buy "distressed" wood, but it is better to find real reclaimed wood.
Look for an old fence post, a barn beam, or even a piece of driftwood if you live near the coast.
Jacky used an old 4x4 post from a demolished porch.
He sanded it lightly but left the nail holes and scratches. That is the character.
The "Wrap" Technique:
You don't need to drill holes through the wood unless you want a very clean look.
The easier, more bohemians style is to wrap the cords.
Buy 3, 5, or 7 "Pendant Light Kits." These are just long cloth cords with a plug on one end and a socket on the other.
Lay the beam on two chairs.
Wrap the cords around the beam 2 or 3 times.
Let the sockets dangle down.
Stagger the heights. Make the middle one lower, the side ones higher.
The Ceiling Connection:
This is the heavy lifting part.
You need two strong hook screws in your ceiling joists to hold the chains that support the beam. wood is heavy.
For the power, you can have all the cords plug into a power strip sitting on top of the beam (hidden from view), with one single master cord running to the ceiling outlet.
Or, you can cut the plugs off and wire them all together into a "canopy" on the ceiling.
Lighting the Table:
For a dining table, you need functional light, not just mood light.
This is where my High-Lumen Filament series comes in.
Don't use the super dim, amber-tinted 200-lumen bulbs here. You can't see your food.
Use clear glass bulbs with 2700K (Warm White) color temperature and at least 600 lumens per bulb.
If you have 5 bulbs, that is 3000 lumens—plenty for a dinner party.
You can mix shapes! Try a pattern: Globe - Pear - Tube - Pear - Globe.
Managing Weight Distribution
A common mistake is unbalancing the beam.
Glass bulbs are light, but metal sockets and heavy cable add up.
Before you hang it, lift the beam by the chains on the ground.
Does it tilt?
Slide the wrapped cords left or right to balance it out.
You don't want your chandelier looking like a seesaw.
Adding a Dimmer is Mandatory
With a multi-bulb fixture3 like this, it can get very bright.
You absolutely need a dimmer switch on the wall.
Ensure the dimmer is LED Compatible4 (remember the Trailing Edge discussion from my previous articles).
Being able to dim those 5 bulbs down to a faint glow turns a dinner table into a romantic setting instantly.
The "Mason Jar" Cluster: Can Kitchen Glassware Be a Light Fixture?
This is a favorite for farmhouse-style kitchens or porches. It protects the bulb and adds a reflective glass layer that amplifies the sparkle of the LED filaments.
Mason jars (canning jars) make excellent transparent shades for LED Edison bulbs because standard twisted mason jars have a mouth opening that perfectly fits a standard socket ring. By drilling a hole in the lid for ventilation and the cord, you can encase the bulb in glass, creating a vintage "firefly in a jar" effect that works beautifully in clusters.

Jacky made these for his hotel's outdoor patio.
Because the bulb is inside a jar, it is somewhat protected from wind and light moisture (though not waterproof).
The Heat Issue (Why LED is Key):
You could never do this with incandescent bulbs.
A 60W incandescent bulb gets to 200°C.
Inside a closed glass jar, the heat would build up until the bulb exploded or the jar cracked.
With my LED Edison bulbs, the heat is minimal.
However, you still need to let the heat out.
The Lid modification:
Take the metal lid of the Mason jar.
Drill a large hole in the center for the socket to pass through.
Then, take a small drill bit and drill 4 to 6 tiny "vent holes" around the outer edge of the lid.
This allows hot air to escape the top, creating a chimney effect.
This keeps the LED driver cool and ensures the bulb lasts for years.
Standard vs. Wide Mouth:
Pay attention to the jar size.
A "Regular Mouth" jar is quite narrow. Standard A19 or ST64 bulbs might trigger a tight squeeze.
A "Wide Mouth" jar is much easier to work with. It allows you to use the larger G80 globe bulbs, which look fantastic filling up the volume of the jar.
The "Cluster" Effect:
One jar on a string looks lonely.
These look best in groups.
Tie 3 or 5 jars together at different heights.
Use a "ceiling spider" hook system to spread them out, or bunch them together like a bouquet of grapes.
Refraction is your friend here.
The ripples in the Mason jar glass take the single lines of the filament and scatter them.
It makes the light sparkle and dance.
It hides the "fake" look of LED filaments and makes them look more like magical glowing embers.
Choosing the Right Cord
Since the jar adds weight, do not use flimsy thin wire.
Use SVT-25 or SVT-3 round cloth-covered electrical cord.
It has a reinforcing filler inside that prevents the copper from stretching under the weight of the glass jar.
Tie a "strain relief knot6" inside the lid so the weight of the jar hangs on the knot, not on the delicate screw terminals of the socket.
Tinted Glass Options
You don't have to stick to clear jars.
Vintage blue or green Mason jars cast a cool, eerie glow that is great for accents.
However, note that colored glass absorbs light.
If you use a blue jar, the light output will drop by 30%.
Compensate by using a brighter bulb (8W instead of 4W).
Conclusion
Building your own light fixture changes your relationship with the room. You are no longer just a consumer; you are a designer. Whether you choose the rugged reliability of iron pipes, the organic warmth of reclaimed wood, or the nostalgic charm of Mason jars, the key to success is pairing the right materials with the right LED Edison bulb technology. By respecting the electrical safety rules—grounding your metal, venting your heat, and securing your connections—you can build a custom piece of art that illuminates your home safely and beautifully. So, go to the hardware store, grab some parts, and let your creativity shine.
Explore the advantages of ST64 bulbs to enhance your pipe fixture design with elegance and functionality. ↩
Learn why grounding is crucial for safety in metal fixtures to prevent electrical hazards and ensure proper functionality. ↩
Choosing the right dimmer for a multi-bulb fixture can optimize your lighting setup, making it both functional and aesthetically pleasing. ↩
Understanding LED compatibility is crucial for ensuring your dimmer switch works effectively with LED bulbs, enhancing your lighting experience. ↩
Explore this link to understand the benefits and applications of SVT-2 cord, ensuring your project is safe and effective. ↩
Learn how to tie a strain relief knot properly to enhance the safety and durability of your electrical projects. ↩