Homeowners spend thousands of dollars on new paint, furniture, and flooring during a renovation, yet they often ruin the final result by reinstalling their old, harsh, clinical lighting.
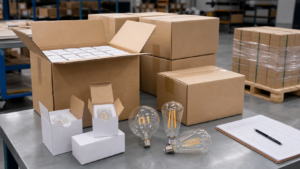
An LED Vintage Bulb Starter Kit is the most cost-effective way to upgrade a home's aesthetic during renovation. By replacing standard A19 bulbs with a curated mix of G25 Globes for vanities, ST64 Edisons for pendants, and T10 Tubes for sconces, you can instantly add warmth, character, and high-end style to any room without hiring an electrician.

I have seen many beautiful houses that feel cold. The owner buys expensive marble countertops. They install real wood floors. But then they go to the supermarket and buy a pack of cheap, cool-white plastic LED bulbs. Suddenly, the kitchen looks like a dentist's office. The marble looks gray. The wood looks flat. It is tragic. As a lighting manufacturer, I want to shake them. "You are 90% there," I want to say. "Just change the bulb." Lighting is not just a utility; it is the makeup of the house. You need a kit. You need a plan. You do not wear the same shoes for running, dancing, and sleeping. Why do you use the same light bulb for every room?
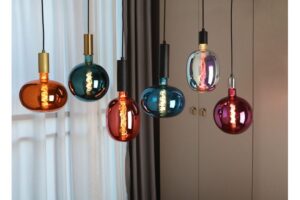
Which Bulb Shape Fits Your New Fixtures?
The most common mistake renovators make is buying a "standard" shape bulb for an exposed fixture, leaving a small, ugly plastic object floating inside a beautiful glass pendant.
To achieve a designer look, you must match the bulb shape to the fixture. Use "ST64" (Teardrop) bulbs for industrial pendants and dining areas, "G80/G95" (Large Globe) bulbs for bathroom vanities and modern chandeliers, and "T10/T45" (Tubular) bulbs for narrow wall sconces and desk lamps.

I recently helped my friend remodel his farmhouse.
He bought these amazing clear glass pendants for his kitchen island.
They cost him $200 each.
Then he put in a regular A60 bulb (the shape of a standard snow cone).
It looked terrible. The bulb was too small. It looked like a mistake.
I brought him a Starter Kit with three specific shapes.
- The ST64 (Edison Shape):
This is the classic "pear" shape with a pointed top. It is long.
I put these in his kitchen pendants.
Because the bulb is long, it fills the glass shade. It looks balanced.
It feels like the bulb was made for the lamp. - The G80 (Large Globe):
He had a sputnik-style chandelier in the dining room.
The sockets are exposed.
A regular bulb looks lumpy there.
The G80 is a perfect round ball. It looks modern and clean.
When we installed them, the chandelier looked like a piece of art. - The T45 (Radio Tube):
In the hallway, he had narrow wall sconces.
A fat bulb would touch the glass.
The T45 is a thin cylinder. It slid right in. It provided a long vertical line of light.
The Problem with "Standard"
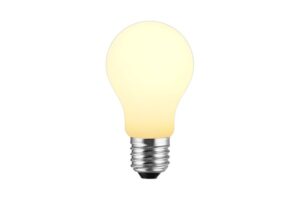
Most people only know the A19/A601 shape.
This shape is designed for lampshades where you cannot see the bulb.
If you are doing a modern renovation with exposed bulbs, the A19 is the enemy.
You need scale. You need geometry.
My "Starter Kit" recommendation always includes a mix.
| Bulb Code | Shape Name | Best Fixture Application | Visual Effect |
|---|---|---|---|
| ST64 / ST192 | Edison / Teardrop | Pendants, Industrial cages | Vintage, Nostalgic |
| G80 / G25 | Globe / Ball | Vanity mirrors, Exposed chandeliers | Modern, Clean, Soft |
| T45 / T10 | Tubular / Radio | Sconces, Banker lamps, Pendants | Sleek, Minimalist |
| A60 / A19 | Standard | Table lamps with shades | Invisible (Utility only) |
Don't let a $2 bulb ruin a $200 fixture. Match the geometry.
Why Is 2700K the Safe Choice for Most Renovations?
Color temperature can be confusing for homeowners, and choosing a light that is too yellow (2200K) or too blue (5000K) can completely alter the feeling of your newly painted walls.
For a versatile "Starter Kit" that works in every room, stick to 2700K (Soft White) clear or lightly tinted bulbs. This color temperature mimics traditional incandescent light, providing a warm, welcoming glow that is functional enough for kitchens but cozy enough for living rooms, unlike the deep amber (2200K) which is too dim for task areas.

My client Jacky sells to interior designers.
He told me a funny story.
A homeowner painted her living room "Dove Grey."
She bought "Daylight" (5000K) LED bulbs because she wanted it "bright."
She turned them on, and the grey walls looked blue. The room felt like a refrigerator.
She cried. She thought the paint store made a mistake.
Jacky went over and changed the bulbs to 2700K Soft White.
Suddenly, the walls looked warm grey again. The wood floor looked rich.
Color temperature is tricky.
- 2200K (Ultra Warm/Amber): This is beautiful for a bar or a bedroom lamp. But if you put it in a kitchen, it looks like a sunset. You can't see if the chicken is cooked. It is too orange.
- 3000K (Warm White): This is good for bathrooms. It is crisp.
- 4000K-5000K (Cool White): Keep this in the garage. Never bring it into the living room.
The Sweet Spot
In a renovation Starter Kit, I argue for 2700K3.
It is the standard incandescent color we all grew up with.
It is the "safe" zone.
It makes skin look healthy. It makes food look appetizing.
It is bright enough to read a book, but warm enough to relax.
We use a clear glass4 or a very light gold tint for these.
Avoid the heavy orange glass unless it is strictly for decoration.
| Tone (Kelvin) | Visual Feel | Best Room Application | Renovation Risk |
|---|---|---|---|
| 2200K | Candlelight / Sunset | Bedroom, Accent Lamp | Too dark for tasks |
| 2700K | Soft White | Living, Dining, Kitchen | Perfect Balance |
| 3000K | Bright White | Bathroom, Office | Can feel a bit sterile |
| 5000K+ | Daylight / Blue | Garage, Hospital | Makes home feel cold |
If you are unsure, buy 2700K. It is the universal donor of lighting.
Why Do You Need "High Lumen" Variations in Your Kit?
A common complaint about vintage bulbs is that they are "just for show" and don't provide enough light to actually see, leaving newly renovated kitchens frustratingly dark.
Modern vintage LED technology now allows for "High Lumen" options that look antique but perform like standard 60W or 75W bulbs. Your starter kit should include specific 800-lumen (8W) bulbs for main overhead lighting, while reserving the standard 400-lumen (4W) bulbs for multi-bulb chandeliers or accent lamps.

In the early days of LED vintage bulbs, they were weak.
They were mostly 2 watts or 4 watts.
They produced about 200 to 300 lumens.
That is fine if you have a chandelier with 10 arms. 10 x 300 = 3000 lumens. That is bright.
But consumers—my casual buyers—often have a single pendant light over a dining table.
They put in a vintage bulb.
They try to eat dinner. They can't see the food.
"Vintage style is impractical," they say.
This is false.
You just bought the wrong wattage.
For your renovation kit, you need to categorize your sockets.
- Primary Source: Is this the main light in the room? (e.g., a central pendant). You need 8 Watts (approx. 800 Lumens). This equals a 60W old bulb.
- Secondary Source: Is this a lamp in the corner? You need 4 Watts (approx. 400 Lumens).
- Decorative Source: Is this a cluster of 20 bulbs? You need 2 Watts.
The High-Output Filament
We now make filaments that are brighter.
We put more LED chips on the stick. We drive them harder.
Our High-Lumen ST645 looks exactly like the dim one, but it lights up the whole room.
When I sell a kit to renovation contractors, I mix them.
"Put these bright ones in the kitchen," I say. "Put these dim ones in the bedroom."
Don't guess. Check the lumens.
| Application | Required Brightness | LED Wattage | Equivalent Old Bulb |
|---|---|---|---|
| Reading / Cooking | 800 Lux (High) | 8W - 10W | 75 Watt |
| Dining / Living | 450 Lux (Medium) | 4W - 6W | 40-60 Watt |
| Mood / Relaxing | 200 Lux (Low) | 2W - 3W | 25 Watt |
A good renovation needs layers of light. You cannot light a whole room with mood lighting.
Should You Upgrade Your Dimmers During Renovation?
Installing new LED bulbs on old, rotary-style dimmer switches from the 1990s often results in annoying buzzing sounds and flickering lights that ruin the peaceful atmosphere of a renovated home.
Renovation is the perfect time to replace old switches with "LED Compatible" (Trailing Edge) dimmers. Including these switches in your starter kit ensures your new vintage bulbs can dim smoothly from 100% down to 5% without noise or strobing, giving you total control over the mood of your new space.

Jacky calls me about this problem constantly.
"Wallson, the client loves the bulbs, but they are buzzing."
I ask, "Did they change the dimmer?"
"No, they kept the old circle knob on the wall."
That is the problem.
Old dimmers (TRIAC Leading Edge) are violent. They chop the electricity to dim the light.
Old light bulbs (incandescent) didn't care. They were just hot wire.
LED bulbs have a computer chip inside (the driver).
When the old dimmer chops the power, the chip gets confused. It vibrates. That is the buzz.
Sometimes it turns on and off rapidly. That is the flicker.
The $20 Fix
When you are renovating, you usually have an electrician there anyway.
Or you are handy with a screwdriver.
Buying a Lutron Diva6 or a Leviton LED dimmer costs about $20.
It uses Trailing Edge7 technology. It is gentle.
I tell all my customers: "If you spend $500 on lights, spend $20 on the switch."
It makes the bulbs last longer.
It lets you dim the light heavily for a romantic dinner.
If you don't change the dimmer, you will likely blame the bulb. But it is not the bulb's fault.
| Issue | Old Dimmer (Incandescent/Halogen) | New Dimmer (LED/CFL Compatible) |
|---|---|---|
| Dimming Range | 100% - 40% (then shuts off) | 100% - 5% (deep dimming) |
| Stability | Flickers at low levels | Steady light |
| Sound | Electrical Hum/Buzz | Silent |
| Bulb Life | Shortens life (stress) | Extends life |
A Starter Kit is not just bulbs. It is the ecosystem. The switch is part of the kit.
Related HongYu product pages
- LED Filament Bulb Product Range → — standard and decorative LED filament bulbs for wholesale and project sourcing.
- Contact HongYu Bulb → — send specifications, target market, quantity and packaging requirements for quotation.
Conclusion
Renovating a home is about creating a feeling, and nothing controls feeling more than lighting. By assembling a Vintage Bulb Starter Kit that includes the right shapes (ST64, G80), the correct color temperature (2700K), appropriate brightness levels, and compatible dimmer switches, you can transform your cold renovation into a warm, designer masterpiece. Don't let standard, grocery-store bulbs undo your hard work; choose lighting that deserves to be seen.
Explore this link to understand why A19/A60 bulbs may not suit modern designs and how to choose better alternatives. ↩
Discover the charm of ST64 / ST19 bulbs and how they can enhance the aesthetic of your space. ↩
Explore the advantages of 2700K lighting to enhance your home ambiance and comfort. ↩
Learn why clear glass is favored in lighting design for optimal brightness and aesthetic appeal. ↩
Explore the advantages of High-Lumen ST64 bulbs for brighter, more efficient lighting solutions. ↩
Explore the Lutron Diva dimmer to understand its features and benefits for enhancing your lighting experience. ↩
Learn about Trailing Edge technology to see how it improves dimming performance and bulb longevity. ↩